 Unless you’ve been living under a rock, you’ve probably heard about Pinterest.
If you are a visual person, you probably have a number of Pinboards full of great stuff you’ve found online.
Do you have a WordPress blog too?
Want to add some of your latest Pins to your blog?
I’m going to show you two different methods to add Pinterest to WordPress blogs.

Pinterest RSS Widget
The Pinterest RSS Widget is a WordPress plugin for Pinterest users that shows your latest pins in your sidebar, blog post or a page of your blog.
Each Pin is listed and linked to separately which makes it easier to find amongst the hundreds or thousands of Pins most of us have on our Pinboards. The plugin works great in a sidebar but it requires a bit of fine-tuning to use on posts and pages. The latest version, 2.2.1, seems to have issues with the thumbnail sizes. The Pinterest plugin we’ll discuss in a bit also has some problems with image sizes but these appear to be the most stable and functional options available right now.
For the sake of this tutorial, I’m going to assume that you know how to install a WordPress plugin and how to add a widget to a sidebar.
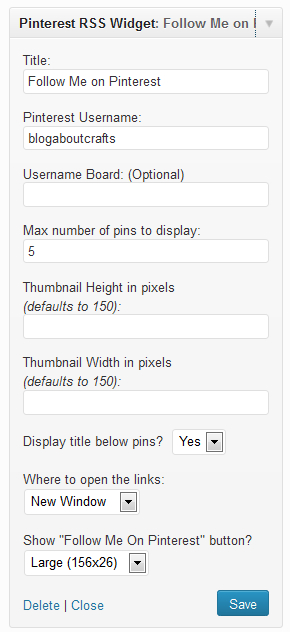
The rest of the setup is merely a matter of entering the information into the fields. I’ve included my set up as an example – make sure you replace my Pinterest username with your own.
Setting Up the Plugin
In my case, I want it display my 5 latest pins on Pinterest. WordPress and the plugin make it easy to have the titles but the plugin does not pull the entire title (for some reason the folks at Pinterest limit the number of characters in the feeds), so you might want to live with it for a while and decide whether or not you want to include the titles.
The thumbnail height option of the plugin does not work right. The thumbnail width option does seem to work. In my case, the default 150px width fits in my theme, so I left the setting blank.
A note about where to open the links. You choices are “same window” or “new window”. I prefer using a new window. That way my visitors aren’t leaving my blog completely to visit my Pinboards. Again, this is a matter of taste and you’ll have to decide what works best for your blog.
Additionally, as you can see from my sidebar, the height of the Pins can vary greatly. If you are prone to pinning taller images, you might want to reduce the number of Pins you display or make them narrower. If you’re like me, your Pin sizes probably vary and while some days your sidebar might be overly long, other days it will probably be fine.
Adding Pinterest to WordPress Blogs with the Pinterest Button & Widget Builder

The Pinterest Button & Widget Builder is a utility on the Pinterest website that helps Pinners embed various Pin-related content to your blog.
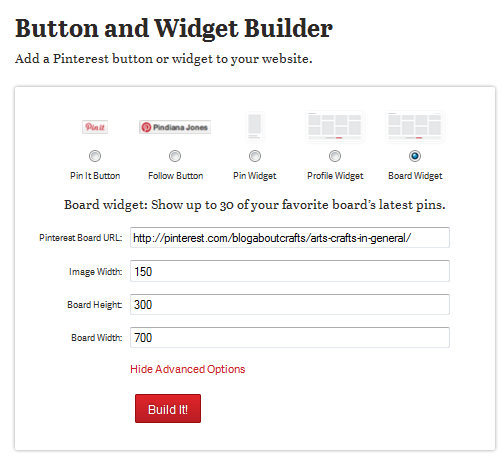
In this case, we’re going to use the Board Widget to present some of the latest pins of a specific board to our WordPress blogs.
The Advanced Options provides you with the ability to exert some control over the size of the images being displayed.
The advantage of using the Pinterest Board Widget is that the Pins are nicely tiled like they appear on Pinterest.com. The disadvantage is that the settings on the widget also seem to have issues with the sizing of the display. No matter what I set it to, the Board Width remained the same. Additionally, the entire block functions as a single link and your visitors will not be able to visit each pin directly. However, since you are showing the latest pins from a single board, that shouldn’t be too big of an issue.
Setting Up the Pinterest Board Widget on Your WordPress Blog
You’ll have to make some changes to your theme to use this but they’re quite simple and easy to do. In order for the widget to work, you’ll have to add the JavaScript code Pinterest provides on the Widget Builder page. (I’ve included the code here but as it might change in the future, it might be better for you to get it from their site.)
Log into your WordPress site and go to the Appearance > Editor option. This is where you can edit all of the settings on your theme. You want to be careful here so you don’t inadvertently destroy anything. If you don’t feel comfortable editing these files, either ask a friend or just stick to having the WordPress Pinterest RSS Widget in your sidebar.
Bring up the footer.php file in the editor and go to the bottom of the file.

You are looking for the closing body tag
</body>
Put the following line above that the closing body tag…
<script type=”text/javascript” src=”//assets.pinterest.com/js/pinit.js”></script>
Place the link provided by the widget onto your blog post or page (don’t forget to be in text mode, otherwise this won’t work). I’ve included a sample so that you can see what it looks like and we can discuss making changes.
<a data-pin-do=”embedBoard” href=”http://pinterest.com/blogaboutcrafts/arts-crafts-in-general/” data-pin-scale-width=”150″ data-pin-scale-height=”300″ data-pin-board-width=”1200″></a>
data-pin-scale-width – the width of the Pinned images (works great)
data-pin-scale-height – seems like it should control the height of the actual Pinned images but it appears to control the height of the entire display of Pins which in turn impacts how many Pins you display at one time
data-pin-board-width – appears to be completely ignored as of the writing of this post
What makes this tool super easy to use is once you get the link code, you can change it manually to see how it looks on your site. You can also just edit the link to show any of your Pinboards.
This is what the code above produces…
If we change the data-pin-scale-width to 75 and data-pin-scale-height to 100…
As you can see, the size you set your Pinned images to can make the overall display larger or smaller. But, like I said, the data-pin-board-width setting is unfortunately completely ignored.
Follow Me
If you liked this tutorial, please let me know. Of course, it wouldn’t hurt if you gave it a bit of Pinning love too. 😉